Showing posts with label Blogger. Show all posts

Saturday, July 30, 2011

How To Redirect A Blog To Another Blog or Website


This post will help all the blogger website owner to redirect their blogger website top any other website or their another blog what they want to redirect too.
To redirect one BlogSpot blog to another needs no Technical Knowledge about HTML, simply copy and paste the code below in the HEAD section of your template by following these steps :
1. Login to your blogger account and click on Design > Edit HTML

2. Now Press CTRL = F and search for </head> 

3. Paste the following code just above this :

<meta HTTP-EQUIV='REFRESH' content='0; url=http://my-new-blog-address'/>
<meta content='NOINDEX, NOFOLLOW' name='ROBOTS'/>


Please change my-new-blog-address to your own new address :

Redirect to Website

Note :
content='0 as shown in the code determines how long (in seconds) your visitors will stay on the old blog before being redirected. I set it to Zero but you might change it depending on your choice.

Also <meta content='NOINDEX, NOFOLLOW' name='ROBOTS'/> tells search engines to stop indexing posts on your old blog.

This prevents your new blog from being penalize by Google for duplicate content as pages indexed on the old blog will be removed in due time.

How To Remove Spaces Between Posts in Blogger

Removing the spaces between the blogger posts which may cover most of the area on your blog so we will simply remove that space by modifying the margin parameters and hence you can increase or decrease the space between the posts.
So from the above images you can get an idea on what we are going to do and the user who requested this post, I Hope if he is reading would be satisfied on what he demanded.

Follow the below procedure to remove space between posts :

1. Go to Blogger.com
2. Sign in and click on Design Tab
3. Now go to Edit HTML and first just backup your template.
4. Now click on Expand Widgets Template and press Ctrl + F to open the search feature.
5. Now search for .post-outer and you will something like below :


6. Now as you see in the above I have highlighted one red box that’s the thing which you have to tweak the larger px the more space so decrease it as what you want and click preview to see how it looks.
So now if you want more space just make it 50px, if you want less space then modify it too 5px to 10px.
That’s it now you know how to increase and decrease space between the blogger post..

Floating Back To Top Button For Blogger


Add Back To Top Button To Blogger


Step 1. In your dashboard click Design'> Add A Gadget > Choose Html/Javascript from the pop up menu.


Step 2. Copy The Code Below And Paste It Into The Html/Javascript gadget.

<a href='http://thenetfabz.blogspot.com'><img alt='Best Blogger Tips' src='https://blogger.googleusercontent.com/img/b/R29vZ2xl/AVvXsEiIAQcq0TjeGeIYX506m9GQfB8no4Lm6QigHDQnG61ssbWVaTJSy1ONkx0XD7eAYPFDYy_n7CF9sB6i0vM_kkNlmYiVecLmj4QYbLnIJDGeU1GXYf2tYQ3HjY8V8YCuW6BsDZBOl4sMO8cl/s1600/best+blogger+tips.png'/></a><script type="text/JavaScript">
var topMargin = 300
var slideTime = 1200
var ns6 = (!document.all && document.getElementById);
var ie4 = (document.all);
var ns4 = (document.layers);
window.setInterval("main()", 10)

function floatObject() {
if (ns4 || ns6) {
findHt = window.innerHeight;
} else if(ie4) {
findHt = document.body.clientHeight;
}
}

function main() {
if (ns4) {
this.currentY = document.floatLayer.top;
this.scrollTop = window.pageYOffset;
mainTrigger();
} else if(ns6) {
this.currentY = parseInt(document.getElementById('floatLayer').style.top);
this.scrollTop = scrollY;
mainTrigger();
} else if(ie4) {
this.currentY = floatLayer.style.pixelTop;
this.scrollTop = document.body.scrollTop;
mainTrigger();
}

}
function mainTrigger() {
var newTargetY = this.scrollTop + this.topMargin
if ( this.currentY != newTargetY ) {
if ( newTargetY != this.targetY ) {
this.targetY = newTargetY
floatStart();
}
animator();
}


}
function floatStart() {
var now = new Date()
this.A = this.targetY - this.currentY
this.B = Math.PI / ( 2 * this.slideTime )
this.C = now.getTime()
if (Math.abs(this.A) > this.findHt) {
this.D = this.A > 0 ? this.targetY - this.findHt : this.targetY + this.findHt
this.A = this.A > 0 ? this.findHt : -this.findHt
} else {
this.D = this.currentY
}
}
function animator() {
var now = new Date()
var newY = this.A * Math.sin( this.B * ( now.getTime() - this.C ) ) + this.D
newY = Math.round(newY)
if (( this.A > 0 && newY > this.currentY ) || ( this.A < 0 && newY < this.currentY )) {
if ( ie4 )floatLayer.style.pixelTop = newY
if ( ns4 )document.floatLayer.top = newY
if ( ns6 )document.getElementById('floatLayer').style.top = newY + "px"
}
}
//-->
</script>
<div id="floatLayer" style="position: absolute; height:20px; width:15; left:650px; top:400px; z-index: 100"><a href="#"><img vspace="0" border="0" hspace="0" alt="Back to Top" src="https://blogger.googleusercontent.com/img/b/R29vZ2xl/AVvXsEh8ac9b_heUrS5Aq5ZMyeTGec6hrtlXbOeLNmqgYohmPPP17g2dcIx7sTCkVWww56KhmJ0X9Er1jVTMoyRePhh__NOXuaCIJD1Tu6f3oaHXjRlBAzRZShd3OPEf8JBW0Hn_1blf3erinC8x/s1600/TOP+BUTTON.gif" title="Back To Top Of Page" /></a></div><a href="http://spiceupyourblog.com" target="_blank"><small>Blogger Top Gadget</small></a>

Important 

If the button stops in the middle of your page and not at the bottom increase the number in red at the start of the code, for example in the demo i had to set that number to 500.

left:650px; = How far from the left the button appears you can increase and decrease it to suit your blog.

top:400px; = How far from the top it appears.

You can change the image used for the button by changing the image URL in blue to any image you wish to use.

Step 3. Save your template - You can drag and drop the gadget to the bottom of your design page as position wont effect the gadget.

Awesome New Google Search Style Search Bar For Blogger


I'm sure you will have noticed the new Google design as covered in the post Evolving the Google design and experience on the official Google blog.While the changes have been subtle some stand out like the new sleek search bar on results pages.The new search bar has a more modern minimalist look with rounded corners and hover effect.But one new feature i quiet like is as you type your text into the search field an X appears than can be clicked to remove your text.Yes it's nothing major but still a neat feature none the less.So in this post i will show you how you can re-create the new Google search bar and use it on your blog.

Once on your blog it will look the very same, using jQuery for the X delete button and your blogs default search to generate results.This was covered on the Awesome Queness.Com design blog and with just a few changes i have it ready to go For Blogger.


Add The New Google Style Search Bar To Blogger


Remember Always Back Up Your Template Before You Make Change


Step 1. In Your Blogger Dashboard Click Design > Edit Html
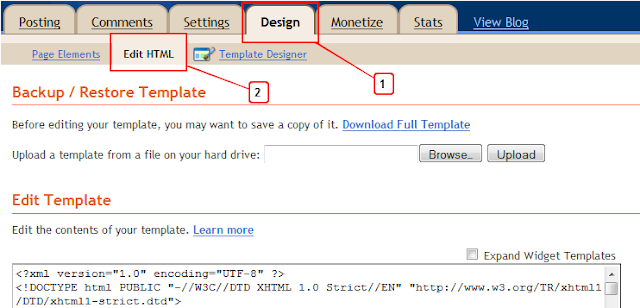
Design Edit Html Blogger

Step 2. Find the following piece of code in your blogs Html : (Click Ctrl and F for a search bar to help find the code )

]]></b:skin>

Step 3. Copy and Paste the following code Directly Above / Before ]]></b:skin>

-Scroll Box Make Sure To Get All The Code.
/*Start Css For Google Style Search Box*/

/* div container containing the form */
#searchContainer {
margin:20px;
}

/* Style the search input field. */
#field {
float:left;
width:200px;
height:27px;
line-height:27px;
text-indent:10px;
font-family:arial, sans-serif;
font-size:1em;
color:#333;
background: #fff;
border:solid 1px #d9d9d9;
border-top:solid 1px #c0c0c0;
border-right:none;
}

/* Style the "X" text button next to the search input field */
#delete {
float:left;
width:16px;
height:29px;
line-height:27px;
margin-right:15px;
padding:0 10px 0 10px;
font-family: "Lucida Sans", "Lucida Sans Unicode",sans-serif;
font-size:22px;
background: #fff;
border:solid 1px #d9d9d9;
border-top:solid 1px #c0c0c0;
border-left:none;
}
/* Set default state of "X" and hide it */
#delete #x {
color:#A1B9ED;
cursor:pointer;
display:none;
}
/* Set the hover state of "X" */
#delete #x:hover {
color:#36c;
}
/* Syle the search button. Settings of line-height, font-size, text-indent used to hide submit value in IE */
#submit {
cursor:pointer;
width:70px;
height: 31px;
line-height:0;
font-size:0;
text-indent:-999px;
color: transparent;
background: url(https://blogger.googleusercontent.com/img/b/R29vZ2xl/AVvXsEhVqio1r4Jo0ag-iERQwL4hLpA9rEJVpm9e7NvyVWh_sU22foze0p3XJ1qH6dgtbKOrm-BHcIBOBNIlWSYxAHKWybF91lc3DbKvTuiSljQjBiD1LvtFL92oGyj4T_vv09DRNU0_L8PZ6OQm/s1600/ico-search.png) no-repeat #4d90fe center;
border: 1px solid #3079ED;
-moz-border-radius: 2px;
-webkit-border-radius: 2px;
}
/* Style the search button hover state */
#submit:hover {
background: url(https://blogger.googleusercontent.com/img/b/R29vZ2xl/AVvXsEhVqio1r4Jo0ag-iERQwL4hLpA9rEJVpm9e7NvyVWh_sU22foze0p3XJ1qH6dgtbKOrm-BHcIBOBNIlWSYxAHKWybF91lc3DbKvTuiSljQjBiD1LvtFL92oGyj4T_vv09DRNU0_L8PZ6OQm/s1600/ico-search.png) no-repeat center #357AE8;
border: 1px solid #2F5BB7;
}
/* Clear floats */
.fclear {clear:both}

/*End Google Style Search Bar - Info @ http://www.spiceupyourblog.com*/

Note - To change the width of the search bar simply change the line highlighted in Red from 200px up or down.

Step 4. Find the following piece of code in your blogs Html : (Click Ctrl and F for a search bar to help find the code )

</head>

Step 5. Now Copy And Paste This Code Directly Above / Before </head>

Note - If you have previously added jQuery script to your template you can remove the code highlighted in green.

<script src='http://code.jquery.com/jquery-1.6.1.min.js' type='text/javascript'/>
<script type='text/javascript'>
$().ready(function() {
// if text input field value is not empty show the &quot;X&quot; button
$(&quot;#field&quot;).keyup(function() {
$(&quot;#x&quot;).fadeIn();
if ($.trim($(&quot;#field&quot;).val()) == &quot;&quot;) {
$(&quot;#x&quot;).fadeOut();
}
});
// on click of &quot;X&quot;, delete input field value and hide &quot;X&quot;
$(&quot;#x&quot;).click(function() {
$(&quot;#field&quot;).val(&quot;&quot;);
$(this).hide();
});
});
</script>

Step 6. Save your template, we have the Css added to style the search bar and the jQuery for the X button now we add the html.

Step 7. Head back to your blogs design page and click Add A Gadget > Choose Html/Javascript.


Step 8. Copy and Paste the following code into the Html/Javascript gadget :

<div id="searchContainer">
<form name="SUYB" action="/search" method="get">
<input type="text" id="field" id="s" name="q"/>
<div id="delete"><span id="x">x</span></div>
<input type="submit" name="submit" id="submit" value="Search" />
</form>
</div>

Step 9. Save the html/javascript gadget and you can drag and drop it into place.

Adding Infolinks Related Tags below Post Title

How you can put the info links related to ask above and below the post title in blogger blogs. This can be useful to increase your Revenue and give you much much higher earnings.

Follow the below steps :

1. Go to Infolinks website and Sign in with your account.


2. Now click on the tab saying “NEW”  ( this is where related would be applied ) related tags that look something like below :

Adding Infolinks Related Tags Post Title

3. So in this section you have two options to choose from :
  • Automatic Option : by just clicking the check box it automatically adds your related tags to the main optimized area.
  • Manual Placement : this is what we are going to use and this will help us placing our tags above or below the post title.
4. Now select the manual placement code like below :

Adding Infolinks Related Tags Post Title

5.Now go to blogger.com and simply Sign In, after signing in go to Design and the Edit HTML.

6. Now first of all backup your template for future problems and now click expand widgets template check box.

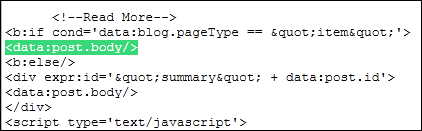
7. Press Ctrl + F to open the search feature and search for below code :

<data:post.body/>


8. Now it will be highlighted like below :
Adding Infolinks Related Tags Post Title

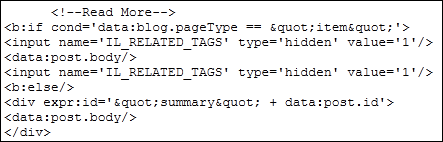
9. Now if you want to show the Infolinks related tags just below the Post Title simply ass the manual placement code above this line and if you wanna show the code in the post footer like my posts are showing just ass the manual placement code below this line like below :

<input name='IL_RELATED_TAGS' type='hidden' value='1'/>


Adding Infolinks Related Tags Post Title

10. That’s it now you will have related tags showing in the posts section so enjoy.
Enjoy higher revenue with Infolinks.

Redirect BlogSpot Website To Another URL

Redirection can occur anytime, it could be due to some code problem or shifting purpose or anything so if you are one of them who want to Redirect their domain to another URL then this guide is just for you.

Follow the below steps .:

1. Open blogger.com and then go to Design Tab.

2. Now click on Edit HTML and then Search for <head> tag.


3. After you are their where the <head> tag is copy below code and paste it right below the <head> tag.

<meta name="robots" content="noindex" /><script type="text/javascript"><!--//--><![CDATA[//><!--
var url = "Enter Destination URL"
(document.images) ? location.replace(url) : location.href = url;
//--><!]]></script>
<meta http-equiv="refresh" content="0;URL=Enter Destination URL " />

4. After you had pasted the above code now find <body> tag and paste the below code right below it.

<p><a href="Enter Destination URL"></a>.</p>

5. Now change the code in purple with the exact URL you wanna redirect too and that’s it.

6. Now the last step is too hit the Save Template Button and see the changes.

How To Use Images For List Bullet Points On Your Blog


Images As Bullet Points In ListsAdd Image Bullet Points To Your Blog

For Wordpress or other platforms paste the Css code in your style sheet and add the class to the list html in the same way.

Add The Css To Blogger

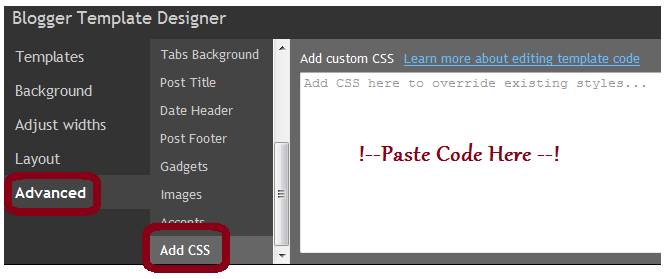
Step 1. Copy the Css code below for the Bullet Image you want to use from below.On Blogger you add it via the template designer by going to Design > Template Designer > Advanced > Add Css as shown below, remember to click apply to blog to save.


Use Your Own Image - Replace IMAGE-URL-HERE with an image around 12x12px.

ul.imglist {
margin: 0;
padding: 0;
}
ul.imglist li {
margin: 0;
list-style-image:url('IMAGE-URL-HERE');
}

Ready To Use Images - These have the image shown already included.

Green Tic Bullet 1


ul.imglist {
margin: 0;
padding: 0;
}
ul.imglist li {
margin: 0;
list-style-image:url('https://blogger.googleusercontent.com/img/b/R29vZ2xl/AVvXsEhuT4gRQQXRcLpDkjjKha7MpZbLFiIW9wbsHdhCQfSE2ks5TtxxzAKW9shBdXfu1i-yctuG9y2PuZ9uVQEkYEF3ODA4sEjkzuBwnH-gp_ZQaGQceuRzr2pl3Kz2wSQv0DfkaL6o5fcokT-d/s1600/bullet-point-green-tick.png');
}

Green Tick Bullet 2.


ul.imglist {
margin: 0;
padding: 0;
}
ul.imglist li {
margin: 0;
list-style-image:url('https://blogger.googleusercontent.com/img/b/R29vZ2xl/AVvXsEi4Qk2iPsTX-4amidAFC8YOhxiyrqofKuv8ImKQmrPE-Q3B-u-lC2ouglAaK7tL0vuJmVdEt8Lo2wEjw1kHKcRsHvm7oRW59Krsga4o3rGPx9Z7iEL_a25uh3d_UDyfJuCOR_xuoKV17E25/s1600/bullet-point-image-6.gif');
}

Maroon Arrow Bullet Point


ul.imglist {
margin: 0;
padding: 0;
}
ul.imglist li {
margin: 0;
list-style-image:url('https://blogger.googleusercontent.com/img/b/R29vZ2xl/AVvXsEhCRRLRJRSuS6xfXKvVYovV_z_fKzWaIErZbiFfnR88LqFrvrCi5su8lmHrD1hf-Qn847VBPcbZA7UwwmXJNdwpAHDXY6xdZtPnZlcC4n3WQczdmPM4KpUwIup9ZIjZ9doZI84skysx_V3X/s1600/bullet-point-image-1.png');
}

Flower Bullet Point


ul.imglist {
margin: 0;
padding: 0;
}
ul.imglist li {
margin: 0;
list-style-image:url('https://blogger.googleusercontent.com/img/b/R29vZ2xl/AVvXsEhC10QYlb1_uqLXyWscDI6wnXsguIoOePhyBdACfPRUj-cfJJ-WCAvR1Va3DMakeein2zjeWRfgmsEJ8Z8VN_TcbH5n7ZkGxxZ4zAqquUux5UbYqK7PEf3r8SLjaXUzSMbVYuyscyPmxGcX/s1600/bullet-point-image-4.jpg');
}

Orange Double Arrow Bullet Point


ul.imglist {
margin: 0;
padding: 0;
}
ul.imglist li {
margin: 0;
list-style-image:url('https://blogger.googleusercontent.com/img/b/R29vZ2xl/AVvXsEh3PDJIsbQXZYJVFhndVzaA9SG3EWjgVn9DWFw_yy24GaSqkW6BisFKvfBwA8sTN5tOZ0HS6rvTpz-EgBroet5rvAso0KbRe6eu1O2sSciWctPR0LCU3EVTrYa9qW_K67XTBTnbKxA2Nuya/s1600/bullet-point-image-5.gif');
}

Yellow Tick Bullet Point


ul.imglist {
margin: 0;
padding: 0;
}
ul.imglist li {
margin: 0;
list-style-image:url('https://blogger.googleusercontent.com/img/b/R29vZ2xl/AVvXsEi4Qk2iPsTX-4amidAFC8YOhxiyrqofKuv8ImKQmrPE-Q3B-u-lC2ouglAaK7tL0vuJmVdEt8Lo2wEjw1kHKcRsHvm7oRW59Krsga4o3rGPx9Z7iEL_a25uh3d_UDyfJuCOR_xuoKV17E25/s1600/bullet-point-image-6.gif');
}

Blue Plus Bullet point


ul.imglist {
margin: 0;
padding: 0;
}
ul.imglist li {
margin: 0;
list-style-image:url('https://blogger.googleusercontent.com/img/b/R29vZ2xl/AVvXsEgpjT1jbowSZ8WzUApkSbZiNW7-PeWwo9Ze3_OtZZ0yqixVaS6_Ly8JSZ4Fa125jqNwv69_lo3stHyQvMg-4UBIWZAa2dEPjle0aPd13XZNCT5DC7w3pAdXaI94G8273WAH4epRq1o81hyphenhyphen1/s1600/bullet-point-image-8.png');
}

Orange Dimond Bullet Point


ul.imglist {
margin: 0;
padding: 0;
}
ul.imglist li {
margin: 0;
list-style-image:url('https://blogger.googleusercontent.com/img/b/R29vZ2xl/AVvXsEj0Opvqbny7zRKYI0zzYhLqAPi7BE0AfqgkgNdUeLH0dbCrr79SpQamZKZrRqhwmTJHzyyt0AFCopIyqDeYFIwGGkEZmenWpjzCnAqw-xCzLMDb73tMqV6Qtm3yZCulJnWVaQcRzrPm4pqi/s1600/bullet-point-image-9.gif');
}

Double Bullet Point


ul.imglist {
margin: 0;
padding: 0;
}
ul.imglist li {
margin: 0;
list-style-image:url('https://blogger.googleusercontent.com/img/b/R29vZ2xl/AVvXsEhmLfbhoJSI9w0l7fjQJpInUA-lLE8WFNiZeZgRwYDD8vjfDYdsFPzIwgWUPyhnQkNCDiEtf75Fz5yw2gTEmq6hyphenhyphenAxPZqKFgWACx7iJjZ-6BQC7eAW32q0Nr-Q1hoZ2IpUlr-377-SLk5pM/s1600/bullet-point-image-10.gif');
}

Simple Circle Bullet Point


ul.imglist {
margin: 0;
padding: 0;
}
ul.imglist li {
margin: 0;
list-style-image:url('https://blogger.googleusercontent.com/img/b/R29vZ2xl/AVvXsEi3jd7UOMtRi1iqKtGdbidPJHyFkD9b02teayvjtWjWVbunKZS_Rn3eP8cmJIEwCTS-xzUAJJUAEB9LOqxPcVhGpQlA9hT04Ze1ZTxkmrDM0HoHW9qBV7umn4fCjRTJBjNor8DgdMCxoGDA/s1600/circle-bullet-point-image.png');
}

Thats the Css, We now have to add a class to the lists we want to use images on.

When you create an unordered list this is the code you use :

<ul>
<li>Item One</li>
<li>Item Two</li>
</ul>

We simply add class='imglist' to the ul tag like this :

<ul class="imglist">
<li>Item One</li>
<li>Item Two</li>
</ul>

Host your Image on Blogger for Free with Unlimited Bandwidth

Hosting your Images on Blogger with Unlimited Bandwidth for Free!. There are so many Free image hosting sites online.Some of the most popular sites include Imageshack, Photobucket, Tinypic, Flicker, Picasa, etc.. But they all have Limited Features, Like a Limited number of uploads, Image size Limits, Less Speed and especially bandwidth limits. Here, we are on the blogger platform, Blogger give free image hosting with unlimited bandwidth. All we need to know is how to upload the images to blogger.But some Bloggers are facing problems while getting the hotlink image URL to their images.This tutorial covers image uploads and will also be useful for some of my upcoming Great Tutorials.


How to Host your Image on Blogger?

Step 1: Login to Blogger Dashboard > Click on NEWPOST button
Step 2: Click the Compose tab --> Click on Insert Image icon()
Step 3: Click the Choose Files button
Step 4: Select the Files and Click the Open Button
Wait for a while till the image is finished uploading.
Step 5: Select the Uploaded image and Click the Add Selected button.
Step 6: Click on the Edit HTML tab
Step 7: you will see the two image Urls, but u pick Original image Url after the href tag.

Use the image any where you want with unlimited bandwidth.
If you upload the two or more images at once you will get the urls after the href tag, but make sure the image name is different!
This is a small tutorial about Blogger images upload and in upcoming tutorial i will give you the Most wanted tips and tricks about blogger images, those are very simple and every Blogger should must know it.

The New Share This Bookmarking Buttons With Share Count For Blogger

Share This is a very popular service offering multiple
Social Bookmarking Widgets for blogs and websites.The green Share This icon is a familiar sight on many of the top blogs opening up a wide range of options for readers to Bookmark and share the content.In this post i have a Blogger Tip show you how to add the new Share This 'Oath' Counter Buttons to various positions on your blog.You can see the buttons in question to the top of this paragraph and that position will be one of the options for your blog.

To generate the buttons you will need to go to the Share This website and use their very easy generator process.

Add The New Share This Counter Buttons To Your Blog


Add The Share This Script


When you have chosen your buttons you will be presented with two snippets of code.The top snippet is for the actual buttons and we will need that later now we will add the second snippet of code to your template.This code only needs to be added once and will allow all the buttons to work.

Step 1. In your Blogger dashboard click Design > Edit Html

Step 2. Find the following piece of code in your blogs Html : (Click Ctrl and F for a search bar to help find the code )

</head>

Step 3. Copy and paste the second snippet of code from Share This directly above </head> then save your template.

That's the script added, how easy was that.

Add The Counter Buttons Buttons To Your Blog


So i will show you how to add the buttons to various positions on your blog.Namely horizontally above your posts (Below the post title), Vertically At the top of your posts wrapped in text and horizontally below your posts.You can also add them to a Html/Javascript gadget in your sidebar.

For all positions you need to go your your blogs html, that's Design > Edit Html > and tick the Expand widget templates box.

Horizontally Above Posts


Find This Code and paste the button code directly below it, save and that's it !

<div class='post-header-line-1'/>

Horizontally Below Posts


Find this code and paste the code below it, save and once again that's it !

<div class='post-footer'>

Wrapped In Text At The Top Left Or Right Of Posts


For this there is a little extra work, we need to set the buttons to sit on the left or right and we need them to be vertical.To do this i have added code to put them on the left, you will also need to add the line break tag between each button.

To add the line break you add <br/> between the code for each button.So in your button code after every instance of </span> you add <br/> to look like the example below :

<span class='st_twitter_hcount' displayText='Tweet'></span><br/><span class='st_facebook_hcount' displayText='Facebook'></span><br/><span class='st_friendfeed_hcount' displayText='FriendFeed'></span><br/><span class='st_blogger_hcount' displayText='Blogger'></span><br/><span class='st_sharethis_hcount' displayText='ShareThis'></span><br/>

First we find the position in your template for your buttons, once again we are clicking Design > Edit Html > And Tick The Expand Widget Templates Box.

Find the following code in your blogs Html :

<data:post.body/>

Next we add the following code directly Above <data:post.body/>

<div style="float: left; margin-right:5px;">


! Button Code Here !


</div>

-Replace ! Button Code Here ! with the code for your buttons.
-To have the buttons on the right change left and right to right and left.

Monday, July 25, 2011

jQuery Fade In Scroll To Top Button With Smooth Scroll For Blogger

jQuery smooth scroll to topA Floating back to top button.Since then i have wanted to cover a more up to date back to top modern button.The popular option when it comes to scroll top buttons is to use jQuery for two reasons.Firstly with jQuery you can have the button hidden until the page is scrolled, secondly when clicked the page scrolls smoothly to the top instead of the direct jump a regular link would have.So that's exactly what i have in this tutorial.We will add a button that will only be visible when the reader starts scrolling and then when they click it the page slowly scrolls up easing into position at the top.For the button itself we us a sprite to create a hover effect sprites also keep the page load time down.


Smooth Scroll jQuery Back To Top button


Remember Always Back Up Your Template Before You Make Changes - How To Back Up A Blogger Template

Step 1. In Your Blogger Dashboard Click Design > Edit Html

Design Edit Html Blogger

Step 2. Find the following piece of code in your blogs Html : (Click Ctrl and F for a search bar to help find the code )

]]></b:skin>

Step 3. Copy and Paste the following code Directly Above / Before ]]></b:skin>


#toTop {
display:none;
text-decoration:none;
position:fixed;
bottom:10px;
right:10px;
overflow:hidden;
width:51px;
height:51px;
border:none;
text-indent:-999px;
background:url(https://blogger.googleusercontent.com/img/b/R29vZ2xl/AVvXsEg92jQwzClMdAEVW0krpQ4kj9TK06fOTlh6_Lz5zoeSrwku8PtzPjFJuxljxtPxLcj-AzlkHLbxWw0GwQY8DSvWpBBXQq4y2EQHtSXI0Ii5bvZm2MrgeUCjEHRe9Qe9ZnOeAedeyisuWzY/s1600/ui.totop.png) no-repeat left top;
}
#toTopHover {
background:url(https://blogger.googleusercontent.com/img/b/R29vZ2xl/AVvXsEg92jQwzClMdAEVW0krpQ4kj9TK06fOTlh6_Lz5zoeSrwku8PtzPjFJuxljxtPxLcj-AzlkHLbxWw0GwQY8DSvWpBBXQq4y2EQHtSXI0Ii5bvZm2MrgeUCjEHRe9Qe9ZnOeAedeyisuWzY/s1600/ui.totop.png) no-repeat left -51px;
width:51px;
height:51px;
display:block;
overflow:hidden;
float:left;
opacity: 0;
-moz-opacity: 0;
filter:alpha(opacity=0);
}
#toTop:active, #toTop:focus {
outline:none;
}

Note - To move the button to the left of your blog change right:10px; to left:10px; .

Step 4. Find the following piece of code in your blogs Html : (Click Ctrl and F for a search bar to help find the code - How To Find Code In Blogger Template Template)

</head>

Step 5. Now Copy And Paste This Code Directly Above / Before </head>

Note - If you have previously added jQuery script to your template you can leave out the line in green.
<script src='http://code.jquery.com/jquery-1.6.1.min.js' type='text/javascript'/>
<script src='http://spiceupyourblogextras.googlecode.com/files/easing.js' type='text/javascript'/>
<script src='http://spiceupyourblogextras.googlecode.com/files/jquery.ui.totop.js' type='text/javascript'/>
<script type='text/javascript'>
$(document).ready(function() {
/*
var defaults = {
containerID: &#39;moccaUItoTop&#39;, // fading element id
containerHoverClass: &#39;moccaUIhover&#39;, // fading element hover class
scrollSpeed: 1200,
easingType: &#39;linear&#39;
};
*/

$().UItoTop({ easingType: &#39;easeOutQuart&#39; });

});
</script>

Step 6. Save your template.

That's it, You can check out your new back to top button after you Comment on and Share this post ! Make sure to check out more of our Blogger Tips.

Add Cool CSS Letter Spacing Text to Blogger

How To Add Cool CSS Letter Spacing Text to Blogger : 

1.Login to your Bogger Dashboard and go to Design >> & Page Elements.

2.Click on 'Add a Gadget' on the sidebar.

3.Select 'HTML/Javascript' and add the one of code given below
<p style="letter-spacing:5px;">Your Text Here</p>

Note: Replace Your Text Here with your text

4. Now Click on Save "Html Java Script" and You are done..
Cheers..

Sunday, July 24, 2011

How to Change Cursor in Blogger Website

Cursor can play very important part in customizing your Blogger Website well after templating everything from posts to ads its time to customize the Cursor. Well the trick I will tell will help you to change your cursor @ any time by just uploading a image file and changing the links weather you want to write your own name on cursor or want to put a Heart for a loved one its your choice so follow the below guide and have FUN.

Follow the Below Steps to Change Cursor Shape :

1. You need to go to www.Blogger.com
2. Sign in with your Blogger account
3. Go to Dashboard than Design
4. Open Edit HTML
5. Click download template so that you have a backup for that template.
6. Now click ctrl + f to open the search feature
7. Search for </head> tag
8. Now paste the below <script> right above </head> tag
<style type='text/css'>body, a, a:hover {cursor: url(http://safir85.ucoz.com/bdlab-blogspot/COOL_GREEN_POINTER.cur), progress;}</style>
9. After pasting just click Save Template.Enjoy This Cursor Changing Trick.

Customization Part : As in the above <Script> Section you can see the .cur URL which is grabbing your new cursor from that URL now if you want to change your cursor than juts change that URL with another one and that’s it your cursor is changed again.

Saturday, July 23, 2011

Speedup Blogger with Lazy Load Script

Well speeding up website on blogger or anywhere means decreasing scripts used on blogger or any other images used so that it don’t have load that much right @ the startup but know you can add a Lazy Load Script which will automatically load images after your other items has been loaded has making them when you scroll than they load which makes blogs much faster.

Follow the below steps to embed Lazy Load Script in Blogger :

1. You need to go to www.Blogger.com 
2. Sign in with your Blogger account
3. Go to Dashboard than Design
4. Open Edit HTML
5. Click download template so that you have a backup for that template.
6. Now click ctrl + f to open the search feature
7. Search for </body> tag
8. Now paste the below <script> right above </body> tag.

<script src='http://ajax.googleapis.com/ajax/libs/jquery/1.4.2/jquery.min.js?ver=1.4.2' type='text/javascript'/>
<script src='
https://sites.google.com/site/merciblogger/jquery.lazyload.mini.js' type='text/javascript'/>
<script type='text/javascript'>
jQuery(document).ready(function($){
if (navigator.platform == &quot;iPad&quot;) return;
jQuery(&#39;img&#39;).lazyload({
effect:&quot;fadeIn&quot;,
placeholder: &quot;
https://blogger.googleusercontent.com/img/b/R29vZ2xl/AVvXsEg2Wh8RzYT46B4rBcYT3imKRWNzc7hoLfhW76Zhgep_ZrP9JbEzMfTtgYbgFxKPravS9dO7h9yyGbW_bS-pozmOJkVDLtXRN8ywL1oWb3uCX3gSXLqlXlU4d32pzPTT7AFnMgjHmhx84-o/&quot;
});
});
</script>


9. After pasting just click Save Template and check your Blogger Blog ii will some stamina in it for the faster loading. Try it out if you are not satisfied than juts remove this script and save template again.

Add A Neat 5 Column Category Label Section To Your Blogs Footer


Displaying all labels in the sidebar is not an option as it would take up too much room.So i have placed them listed alphabetically neatly in the footer across five columns.I then display some of the main labels in the sidebar with a link that jumps directly to the list in the footer for people to navigate.I find this a great use of space and in this Blogger Tip i will show you how i have done it.Below you can see some screenshots and i have the links to each site for you to see the section in action.

Blogger Tip Category Wrapper


Add 5 Column Category Label Wrapper Section To Blogger Footer


Step 1. We start this Blogger tip by going to your Blogger Dashboard and clicking Design > Edit Html

Design Edit Html Blogger

Step 2. Find the following piece of code in your blogs Html :
]]></b:skin>

Step 3. Copy and paste the following code Directly Above / Before ]]></b:skin>

/*Start Category Wrapper Css*/
#category-wrapper {
width:900px;
clear:both;
margin:0 auto 10px;
padding-top:15px;
line-height: 1.6em;
text-align:left;
border-bottom:0px solid #efefef;
}

.cat {
color: #000000;
line-height: 1.5em;
}

.cat ul {
list-style:none;
margin:0 0 0;
padding:0 0 0 8px;
}
.cat ul li {
float:left;
width:18%;
list-style-type: none;
margin: 0 0 5px;
padding-left: 12px;
background:url(https://blogger.googleusercontent.com/img/b/R29vZ2xl/AVvXsEjxmF547CTQWnXk_yTg2LyWrt3_J1SfWYiTdi7SIjrvcU-VxmBDgpeae1ZtdePyR9z9wXi2WVi3lmieCE8NRNBCAfc4xkBYs3rbfieuQY0WwrG-_JUydUyW_-RUGnkN8WhovSJYLwm4DZjD/s1600/bullet-suyb.gif) no-repeat left center;
}

.cat .widget {
border-bottom:0px dotted #ddd;
margin:0 .5em 1.5em .5em;
padding:0 0 1.5em;
}
/* End Category Wrapper Css Info @ http://www.spiceupyourblog.com */

Edits And Options

Width 900px; - Total with of all columns, You may need to change to suit the width of your blog.

width:18%; - Width in percentage of each column, We divided 100 by 5 and gave a little leg room so each column is 18% of the total width.If you increased this to say 23% you would then have 4 columns, 31% would leave you with 3 columns and so on.

In blue is the list bullet image beside each label and you can change it if you please.

Step 4. Find The Following Code In Your Blogs Html

<div id='footer-wrapper'>

Step 5. Copy and Paste the following code directly Above / Before <div id='footer-wrapper'>

<div id='category-wrapper'>
<b:section class='cat' id='cat'>
<b:widget id='Label99' locked='false' title='Categories' type='Label'/>
</b:section>
</div>

Step 5. Save Your Template, the 5 column labels section should not be on your blog !

Linking Directly To The Labels Section


If you now wanted to link to this section as i have done on both blogs this is the link you would use, you can of course change the text 'All labels' :

<a href='#category-wrapper'>All Labels</a>

So in a way the address of the category wrapper is #category-wrapper and that's what you would add to a link in a menu bar or regular hyperlink.That's it for the category wrapper, make sure to check out more of our Blogger Tips.

Wednesday, July 20, 2011

How to create a sticky permanent post in Blogger / BlogSpot Blog

Why we need to create sticky or permanent post , there are many reasons
to do that like if we wants a post as home page or wants to give a site like style to our blogger blog than this is really very useful blogger trick for blogger blog to create a sticky permanent post.

This can be made in two ways– First method is quite simple and hear it is– Create the post (the one you want to be sticky) as usual, and publish it.

Or simply select your old post which you want to be sticky for home page. this is the simplest and most easy method to creat the permanent post.

Now just  edit the post. Now while editing, you did not  have to edit anything in the content zone
but you have to change in the date of publishing – to any future date. This can be done by simply expanding, the Post Options java link at the bottom (see the picture below).

sticky post 2

And your post will remain at top of all post for the future date, so take the date, as far as you want to be sticky the post.

Saturday, June 11, 2011

New feature: Geotagging

The new post editor on Blogger in With geotagging, you can add a location to your each of your blog posts. Just as time stamps help readers find posts from a certain date or time, geotags give your readers a way to browse posts near a specific location.

Adding a geotag to your post is easy. Log into draft.blogger.com, open the post editor, and click the add location link below the main text field.

Use the location editor to search, drag, click and zoom on a map to choose and save a location. We’ll try to label the location you choose using our reverse geocoder, which looks up a name for a point on the map. You can also edit the location name by clicking the blue location name text below the search field.

When you publish your post, the geotag is displayed below your blog post as a link, which will open up Google Maps.

We also include each post’s location in your blog’s RSS and Atom feeds using GeoRSS, a standard for geotagging. This means that feed readers, map applications and search engines can associate your posts with their locations.


We’re still working on other ways to show geotag information on your blog. Brian, the Google engineer who created this feature in his 20% time, has written a gadget that will display your posts on a map. To add it to your blog, click “Add Your Own” on the “Add a Gadget” page and paste in this URL: http://blogmap-gadget.googlecode.com/svn/trunk/blogmap.xml

Geotagging has a few known issues. We'll be addressing them shortly, but here are some suggested workarounds for the near-term:

  • The location editor is hidden behind the text field in the Edit HTML tab. Please switch to the Compose tab to view and edit locations.
  • A geotag cannot be removed from a post once it has been saved. If you need to remove a geotag, please copy your post content into a new post and delete the geotagged post.
  • Update 2:33pm: If you have a customized template and you don't see the "Location:" byline, you may need to reset your blog's widget template. Do this by going to the Layout > Edit HTML tab in your dashboard, and then clicking Revert widget templates to default below the main text field.
  • Update 2:33 pm: Some users are having issues with the blog post map gadget. Brian is investigating.

New mobile templates for reading on the go

We know many of you like to view blog posts on your smartphones. However, it can be difficult at times because of the small screen size. This is why we are excited to announce our first launch of mobile templates! Initially available as opt-in functionality on Blogger in Draft, mobile templates will re-format your blogs for smartphones to enhance your readers’ viewing experience. In order to activate mobile templates, simply go to Dashboard > Settings > Email & Mobile tab, enable the mobile template option and then save settings.


Feature highlights
  • Preview: Get a glimpse of what your blog will look like by clicking on the Mobile Preview button. You can also see it on your smartphone by scanning the QR-code to the right of the options.
  • Automatic redirection: All opted-in blogs will automatically be redirected to the mobile view when accessed from a smartphone*.
  • Template support: We are initially supporting 6 variants of the Simple template and 6 variants of the Awesome template. If you have used one of these 12 templates through our Template Designer, your mobile view will be rendered in the same style as your desktop view (other template variants will be rendered as Simple). Some gadgets are also supported**.


  • Mobile ads: Mobile AdSense ads will be displayed at the top of the post pages and at the bottom of the index page if the blog has an AdSense gadget or inline blog ads.

  • Comments and videos: You will be able to make comments and watch videos.
We hope you enjoy the improved mobile experience.

The New Blogger Dashboard And Design Is Live

Today, we're thrilled to announce the public launch of our redesign! But please wait a second before you go check out your Blogger dashboard, because we’re planning a gradual rollout that will start with a limited set of users who visit our new feature testing ground, Blogger in Draft. At the start, only some of you (lucky draws!) can see the new design on Blogger in Draft. Over the course of the next few days and weeks we’ll be ramping up to support all Draft users. There is no sign-up or activation process required from your side; just wait, and you’ll notice your dashboard has changed to the new design when you log in to Blogger in Draft


Although our team has been hard at work cranking out tons of new features over the last year or so, it’s been a while since our user interface has had a major update so we’re very excited about Blogger’s fresh new look. However, there’s much more to the redesign than shiny new graphics and pages—we’ve essentially rewritten the entire application from scratch, using the latest web technologies that will enable us to make future updates in more agile and flexible ways.

We decided to make the new UI available to our loyal Blogger users as quickly as possible. We realize there might be some ‘rough edges’ (see this page for the known issues)
but fear not, we’ll be continually updating and improving the experience until it’s ready to graduate from Blogger in Draft. Our team is also very eager to hear your feedback, so please don’t hesitate to let us know of any bugs or suggestions by clicking on the “Send feedback” link in the navigation bar (or directly on this form).

Wednesday, June 8, 2011

Easy Way to Track Post Views in Blogger


 Well if you want track post views in blogger .: Tacking post views means checking how many time your post has been read by people. This can be helpful if you want track what's the popularity for the content you have posted or blogger but in blogger there is no way and on wordpress they provide you with a simple way, so I am going to show you a very simply way to tack your posts n blogger and hence check the popularity for that post.

Follow the below steps to track Post Views on Blogger :

1. For tracking purpose we will use the image refreshing technique in this numbers are counted when ever image is reloaded or post has been read.

2. For this thing you will need Google Account so create one @ www.Google.com

3. Than after creation go to www.goo.gl ( it’s a free URL shortening service which provides you with a easy way to make your URL short and also they track the number of click made on your shorted URL.

4. Now just go to www.Photobucket.com or any other image hosting service you use or you like now just upload the image you are going to use in your post this image will be used to track your post views.

5. After successful uploading grab the direct URL to that image and move forward to www.goo.gl and sign in that’s really important because it will not track any URL if you are signed out.

6. So after signing in just paste the direct URL into the bar and click shorten like below I have done.


7. Now just press ctrl + C to copy the short URL or select and again copy the http://goo.gl URL.

8. Now just open the post editor where you are creating the post for your blog now just choose add image and paste the short URL it will automatically grab the image from your image hosting service and you will tracking image on its place to tack your post views now just click publish and check your clicks tracked on www.goo.gl website.

HackingUniversity - Hacks • Pranks • Tricks • How-Tos.