Showing posts with label Blogger Design. Show all posts

Saturday, July 30, 2011

Host your Image on Blogger for Free with Unlimited Bandwidth

Hosting your Images on Blogger with Unlimited Bandwidth for Free!. There are so many Free image hosting sites online.Some of the most popular sites include Imageshack, Photobucket, Tinypic, Flicker, Picasa, etc.. But they all have Limited Features, Like a Limited number of uploads, Image size Limits, Less Speed and especially bandwidth limits. Here, we are on the blogger platform, Blogger give free image hosting with unlimited bandwidth. All we need to know is how to upload the images to blogger.But some Bloggers are facing problems while getting the hotlink image URL to their images.This tutorial covers image uploads and will also be useful for some of my upcoming Great Tutorials.


How to Host your Image on Blogger?

Step 1: Login to Blogger Dashboard > Click on NEWPOST button
Step 2: Click the Compose tab --> Click on Insert Image icon()
Step 3: Click the Choose Files button
Step 4: Select the Files and Click the Open Button
Wait for a while till the image is finished uploading.
Step 5: Select the Uploaded image and Click the Add Selected button.
Step 6: Click on the Edit HTML tab
Step 7: you will see the two image Urls, but u pick Original image Url after the href tag.

Use the image any where you want with unlimited bandwidth.
If you upload the two or more images at once you will get the urls after the href tag, but make sure the image name is different!
This is a small tutorial about Blogger images upload and in upcoming tutorial i will give you the Most wanted tips and tricks about blogger images, those are very simple and every Blogger should must know it.

The New Share This Bookmarking Buttons With Share Count For Blogger

Share This is a very popular service offering multiple
Social Bookmarking Widgets for blogs and websites.The green Share This icon is a familiar sight on many of the top blogs opening up a wide range of options for readers to Bookmark and share the content.In this post i have a Blogger Tip show you how to add the new Share This 'Oath' Counter Buttons to various positions on your blog.You can see the buttons in question to the top of this paragraph and that position will be one of the options for your blog.

To generate the buttons you will need to go to the Share This website and use their very easy generator process.

Add The New Share This Counter Buttons To Your Blog


Add The Share This Script


When you have chosen your buttons you will be presented with two snippets of code.The top snippet is for the actual buttons and we will need that later now we will add the second snippet of code to your template.This code only needs to be added once and will allow all the buttons to work.

Step 1. In your Blogger dashboard click Design > Edit Html

Step 2. Find the following piece of code in your blogs Html : (Click Ctrl and F for a search bar to help find the code )

</head>

Step 3. Copy and paste the second snippet of code from Share This directly above </head> then save your template.

That's the script added, how easy was that.

Add The Counter Buttons Buttons To Your Blog


So i will show you how to add the buttons to various positions on your blog.Namely horizontally above your posts (Below the post title), Vertically At the top of your posts wrapped in text and horizontally below your posts.You can also add them to a Html/Javascript gadget in your sidebar.

For all positions you need to go your your blogs html, that's Design > Edit Html > and tick the Expand widget templates box.

Horizontally Above Posts


Find This Code and paste the button code directly below it, save and that's it !

<div class='post-header-line-1'/>

Horizontally Below Posts


Find this code and paste the code below it, save and once again that's it !

<div class='post-footer'>

Wrapped In Text At The Top Left Or Right Of Posts


For this there is a little extra work, we need to set the buttons to sit on the left or right and we need them to be vertical.To do this i have added code to put them on the left, you will also need to add the line break tag between each button.

To add the line break you add <br/> between the code for each button.So in your button code after every instance of </span> you add <br/> to look like the example below :

<span class='st_twitter_hcount' displayText='Tweet'></span><br/><span class='st_facebook_hcount' displayText='Facebook'></span><br/><span class='st_friendfeed_hcount' displayText='FriendFeed'></span><br/><span class='st_blogger_hcount' displayText='Blogger'></span><br/><span class='st_sharethis_hcount' displayText='ShareThis'></span><br/>

First we find the position in your template for your buttons, once again we are clicking Design > Edit Html > And Tick The Expand Widget Templates Box.

Find the following code in your blogs Html :

<data:post.body/>

Next we add the following code directly Above <data:post.body/>

<div style="float: left; margin-right:5px;">


! Button Code Here !


</div>

-Replace ! Button Code Here ! with the code for your buttons.
-To have the buttons on the right change left and right to right and left.

Monday, July 25, 2011

jQuery Fade In Scroll To Top Button With Smooth Scroll For Blogger

jQuery smooth scroll to topA Floating back to top button.Since then i have wanted to cover a more up to date back to top modern button.The popular option when it comes to scroll top buttons is to use jQuery for two reasons.Firstly with jQuery you can have the button hidden until the page is scrolled, secondly when clicked the page scrolls smoothly to the top instead of the direct jump a regular link would have.So that's exactly what i have in this tutorial.We will add a button that will only be visible when the reader starts scrolling and then when they click it the page slowly scrolls up easing into position at the top.For the button itself we us a sprite to create a hover effect sprites also keep the page load time down.
 

Smooth Scroll jQuery Back To Top button


Remember Always Back Up Your Template Before You Make Changes - How To Back Up A Blogger Template

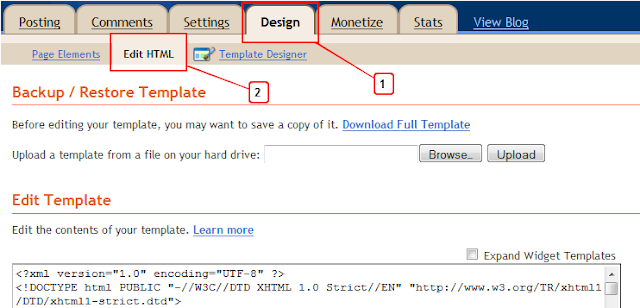
Step 1. In Your Blogger Dashboard Click Design > Edit Html

Design Edit Html Blogger

Step 2. Find the following piece of code in your blogs Html : (Click Ctrl and F for a search bar to help find the code )

]]></b:skin>

Step 3. Copy and Paste the following code Directly Above / Before ]]></b:skin>


#toTop {
display:none;
text-decoration:none;
position:fixed;
bottom:10px;
right:10px;
overflow:hidden;
width:51px;
height:51px;
border:none;
text-indent:-999px;
background:url(https://blogger.googleusercontent.com/img/b/R29vZ2xl/AVvXsEg92jQwzClMdAEVW0krpQ4kj9TK06fOTlh6_Lz5zoeSrwku8PtzPjFJuxljxtPxLcj-AzlkHLbxWw0GwQY8DSvWpBBXQq4y2EQHtSXI0Ii5bvZm2MrgeUCjEHRe9Qe9ZnOeAedeyisuWzY/s1600/ui.totop.png) no-repeat left top;
}
#toTopHover {
background:url(https://blogger.googleusercontent.com/img/b/R29vZ2xl/AVvXsEg92jQwzClMdAEVW0krpQ4kj9TK06fOTlh6_Lz5zoeSrwku8PtzPjFJuxljxtPxLcj-AzlkHLbxWw0GwQY8DSvWpBBXQq4y2EQHtSXI0Ii5bvZm2MrgeUCjEHRe9Qe9ZnOeAedeyisuWzY/s1600/ui.totop.png) no-repeat left -51px;
width:51px;
height:51px;
display:block;
overflow:hidden;
float:left;
opacity: 0;
-moz-opacity: 0;
filter:alpha(opacity=0);
}
#toTop:active, #toTop:focus {
outline:none;
}

Note - To move the button to the left of your blog change right:10px; to left:10px; .

Step 4. Find the following piece of code in your blogs Html : (Click Ctrl and F for a search bar to help find the code - How To Find Code In Blogger Template Template)

</head>

Step 5. Now Copy And Paste This Code Directly Above / Before </head>

Note - If you have previously added jQuery script to your template you can leave out the line in green.
<script src='http://code.jquery.com/jquery-1.6.1.min.js' type='text/javascript'/>
<script src='http://spiceupyourblogextras.googlecode.com/files/easing.js' type='text/javascript'/>
<script src='http://spiceupyourblogextras.googlecode.com/files/jquery.ui.totop.js' type='text/javascript'/>
<script type='text/javascript'>
$(document).ready(function() {
/*
var defaults = {
containerID: &#39;moccaUItoTop&#39;, // fading element id
containerHoverClass: &#39;moccaUIhover&#39;, // fading element hover class
scrollSpeed: 1200,
easingType: &#39;linear&#39;
};
*/

$().UItoTop({ easingType: &#39;easeOutQuart&#39; });

});
</script>

Step 6. Save your template.

That's it, You can check out your new back to top button after you Comment on and Share this post ! Make sure to check out more of our Blogger Tips.

Add Cool CSS Letter Spacing Text to Blogger

How To Add Cool CSS Letter Spacing Text to Blogger : 

1.Login to your Bogger Dashboard and go to Design >> & Page Elements.

2.Click on 'Add a Gadget' on the sidebar.

3.Select 'HTML/Javascript' and add the one of code given below
<p style="letter-spacing:5px;">Your Text Here</p>

Note: Replace Your Text Here with your text

4. Now Click on Save "Html Java Script" and You are done..
Cheers..

Saturday, July 23, 2011

Add A Neat 5 Column Category Label Section To Your Blogs Footer


Displaying all labels in the sidebar is not an option as it would take up too much room.So i have placed them listed alphabetically neatly in the footer across five columns.I then display some of the main labels in the sidebar with a link that jumps directly to the list in the footer for people to navigate.I find this a great use of space and in this Blogger Tip i will show you how i have done it.Below you can see some screenshots and i have the links to each site for you to see the section in action.

Blogger Tip Category Wrapper


Add 5 Column Category Label Wrapper Section To Blogger Footer


Step 1. We start this Blogger tip by going to your Blogger Dashboard and clicking Design > Edit Html

Design Edit Html Blogger

Step 2. Find the following piece of code in your blogs Html :
]]></b:skin>

Step 3. Copy and paste the following code Directly Above / Before ]]></b:skin>

/*Start Category Wrapper Css*/
#category-wrapper {
width:900px;
clear:both;
margin:0 auto 10px;
padding-top:15px;
line-height: 1.6em;
text-align:left;
border-bottom:0px solid #efefef;
}

.cat {
color: #000000;
line-height: 1.5em;
}

.cat ul {
list-style:none;
margin:0 0 0;
padding:0 0 0 8px;
}
.cat ul li {
float:left;
width:18%;
list-style-type: none;
margin: 0 0 5px;
padding-left: 12px;
background:url(https://blogger.googleusercontent.com/img/b/R29vZ2xl/AVvXsEjxmF547CTQWnXk_yTg2LyWrt3_J1SfWYiTdi7SIjrvcU-VxmBDgpeae1ZtdePyR9z9wXi2WVi3lmieCE8NRNBCAfc4xkBYs3rbfieuQY0WwrG-_JUydUyW_-RUGnkN8WhovSJYLwm4DZjD/s1600/bullet-suyb.gif) no-repeat left center;
}

.cat .widget {
border-bottom:0px dotted #ddd;
margin:0 .5em 1.5em .5em;
padding:0 0 1.5em;
}
/* End Category Wrapper Css Info @ http://www.spiceupyourblog.com */

Edits And Options

Width 900px; - Total with of all columns, You may need to change to suit the width of your blog.

width:18%; - Width in percentage of each column, We divided 100 by 5 and gave a little leg room so each column is 18% of the total width.If you increased this to say 23% you would then have 4 columns, 31% would leave you with 3 columns and so on.

In blue is the list bullet image beside each label and you can change it if you please.

Step 4. Find The Following Code In Your Blogs Html

<div id='footer-wrapper'>

Step 5. Copy and Paste the following code directly Above / Before <div id='footer-wrapper'>

<div id='category-wrapper'>
<b:section class='cat' id='cat'>
<b:widget id='Label99' locked='false' title='Categories' type='Label'/>
</b:section>
</div>

Step 5. Save Your Template, the 5 column labels section should not be on your blog !

Linking Directly To The Labels Section


If you now wanted to link to this section as i have done on both blogs this is the link you would use, you can of course change the text 'All labels' :

<a href='#category-wrapper'>All Labels</a>

So in a way the address of the category wrapper is #category-wrapper and that's what you would add to a link in a menu bar or regular hyperlink.That's it for the category wrapper, make sure to check out more of our Blogger Tips.

Sunday, June 26, 2011

How to make all links open in new windows

This request to make all hyperlinks pops up every now and then so might as well make a post for it. To make all links open in new window is amazingly simple. Just sign into
DASHBOARD > DESIGN > EDIT HTML
to open template editor

Use keyboard shortcut ctrl+F to find <head> and immediately after that, add a single line <base target='_blank' /> so that it become

<head>
<base target='_blank' />

Save the edited template, all links in your blog will now open in new tabs or windows.

Sunday, June 12, 2011

Use Your Own Photo for Your Blog’s Background

After we launched the Blogger Template Designer, one of the most requested features was the ability to upload your own background image. Though we provide hundreds of professional stock photos from iStockPhoto, we know many of you are serious photo buffs and would like to use your own beautiful photo as your blog’s background image.

And now you can! Go to Design | Template Designer | Background, click on Background Image, and you’ll notice a new “Upload image” option, which will allow you to select and upload your image.


For images that fill the entire background, we recommend using a resolution of 1800 pixels wide and 1600 pixels high, and file size less than 200KB to minimize the loading time of your blog pages. We support JPEG, GIF, and PNG format images.

After uploading a photo, you will see additional options that are not available for the built-in images: Alignment, Repeat, and Scroll options.


  • Alignment: You can adjust horizontal (left, center, right) and vertical (top and bottom) alignment of your background image.
  • Repeat (Tile): If you have a small image, you can have it repeat horizontally and/or vertically to fill the page. Otherwise, we recommend that you choose a page background color that blends in with your background image.
  • Scroll: By default, your image stays in place while readers scroll the page contents. By selecting the “Scroll with page” option, both the background image and page contents scroll together. We recommend that you use an image that blends into your background color or set your image to tile vertically if you choose this option.
If you like this post please spare time to share this :)

Saturday, June 11, 2011

How to Customize Your Favicon


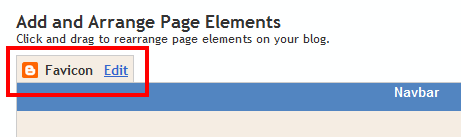
For many bloggers, having a custom favicon (the tiny image displayed in your browser’s window or tab) is the finishing touch that ties together the design and identity of a great looking blog. Today, we're pleased to announce that Blogger in Draft users can now add a customized favicon to their blog.

You can add a custom favicon from the Design | Page Elements tab (or, from the Layout tab if you're using the new user interface), by clicking Edit on the new “Favicon” setting above the navbar element:


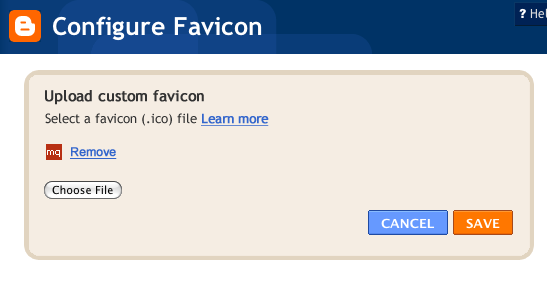
A new window will then open where you can select an image from your hard drive to replace the default favicon image. This initial launch only supports .ico files, but you can easily convert your JPEG, PNG, or other non-ico image file using your own image software. There are also many conversion tools online, and a quick Google Search brings up a handful of options such as http://www.icoconverter.com/.


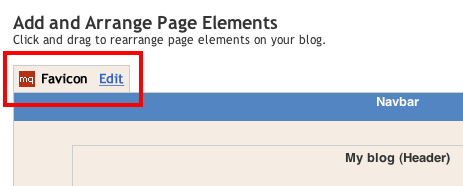
Once you’ve selected the .ico file for your favicon, click Save. We'll automatically resize the image to the correct dimensions, and you’ll then see the Page Elements updated with your selected favicon image:


When you save your template changes, you’ll see your newly-added favicon image displayed in your browser window or tab. That’s it!

In the future, we’ll add support for more non-ico image formats, so stay tuned. In the meantime, please leave us a comment below and let us know what you think.

The Blogger Template Designer

Today we’re taking a big first step in improving not just our template designs, but all the ways that you can customize the look and layout of your blog.

Here’s what we’re launching today to Blogger in Draft:

  • 15 new, highly-customizable templates from our design team, split into four families: Simple, Picture Window, Awesome Inc, and Watermark
  • One-, two-, and three-column layouts for each template, with complete control over the size and arrangement of the columns
  • Hundreds of background images and patterns from iStockphoto, the leading microstock image marketplace


Try it Now

Go to http://draft.blogger.com/ to log in to Blogger in Draft. (If you’ve never been there before, Blogger in Draft is just like regular Blogger, except with new, in-development features like this one.) Click on your blog’s “Layout” link to go to the Layout tab. The link to the Template Designer is at the end of the row of sub-tabs.


You can use the live preview to see your new template without affecting your blog. When you find a new look that you’re happy with, just click the “Apply to Blog” button to publish it to the world. Note: You can backup your existing template ahead of time by going to Layout > Edit HTML. We recommend this if you have a customized blog design that you might want to go back to.

Classic template blogs: If you have a “Template” link or tab instead of “Layout,” you’ll first need to switch from Classic to Layouts before you can try out the Template Designer. Go to Classic > Customize Design and follow the instructions there. You’ll need to switch to one of our old templates first, but then you’ll be able to use the Template Designer to pick a new one.


Tips from the Blogger Team
  • Get your links to match a background image quickly by using the Background panel’s “Main color theme” to adjust all of your blog’s colors at once. This works particularly well with Simple’s second design.
  • With a three-column footer, you can fit in several gadgets to interest your readers after they’re done reading your post. For inspiration, read Derek Powazek’s post, “Embrace your bottom!”
  • If you’re using our new Pages feature, put the Page List gadget in the wide section at the top of your blog. We’ve added unique tab designs to all of the new templates.
  • Many of the patterns in the background image picker are semi-transparent, to let your blog’s background color show through. Look for the “transparency page curl” to see which patterns these are.
  • The Attribution gadget (added to the footer by all new templates) is there to give credit not just to the designer and artist of the background image, but to you as well. Edit its settings by clicking “Edit” on Layout > Page Elements to add your own authorship or copyright information.


Get Involved
  • Show off your new design on Twitter by tweeting your blog’s URL with the hashtag #newbloggertemplate. We’ll be looking for creative designs to feature in upcoming blog posts or as Blogs of Note.
  • We’re taking feature requests. Let us know what else you’d like to see with our Google Moderator page. (And don’t worry: uploading your own background image is already filed and at the top of our list!)
  • To report bugs or discuss the Template Designer in more detail, start a thread on our discussion forum. Include “Template Designer” in the subject so we’ll be sure to see it.
  • Do you design templates for Blogger? Join our template designer group for documentation and discussion on working with the new templates, as well as details on how to get your designs into the Template Designer.
Over the coming weeks and months we’ll be adding new features, templates, and images guided by the feedback we hear from you.


Miscellaneous Notes
  • The Template Designer is not supported on Internet Explorer 6, nor, for that matter, are the new templates. While we’ve made an effort to ensure that they’ll still be readable, the new designs are not going to look particularly attractive on IE6. We strongly encourage the very small number of bloggers and readers still using IE6 to upgrade to a more modern browser. For more information about browsers, visit Google’s What Browser? site.
  • The rounded corners and drop shadows used in several of the templates may not be visible in older versions of some browsers. Opera users will need to wait for Opera 10.5, currently in public pre-alpha release. IE7 and 8 users will not see these effects within the Template Designer, but will see most of them on the live blog itself.
  • From within the Template Designer you can only move gadgets around, you can’t add, delete, or change their settings. Those features are still on the Layout > Page Elements page.
  • Some gadgets, such as Poll, Reactions, or third-party Google Gadgets will not reflect color changes in the live preview but will after the template is applied. Others, such as Followers and AdSense, will not change colors automatically at all. It may be easiest to remove and re-add these gadgets to refresh their palettes, though you could also tweak the colors by hand by editing their settings.
  • Customizations to widget templates will be cleared when applying a new template to preserve the new layout. If you have made changes to your widget templates, save them first by going to Layout > Edit HTML and clicking “Download Full Template.” You’ll be able to copy them back in as needed after you apply your new template.
HackingUniversity - Hacks • Pranks • Tricks • How-Tos.