Saturday, March 17, 2012
Saturday, July 30, 2011
How To Redirect A Blog To Another Blog or Website
This post will help all the blogger website owner to redirect their blogger website top any other website or their another blog what they want to redirect too.
To redirect one BlogSpot blog to another needs no Technical Knowledge about HTML, simply copy and paste the code below in the HEAD section of your template by following these steps :
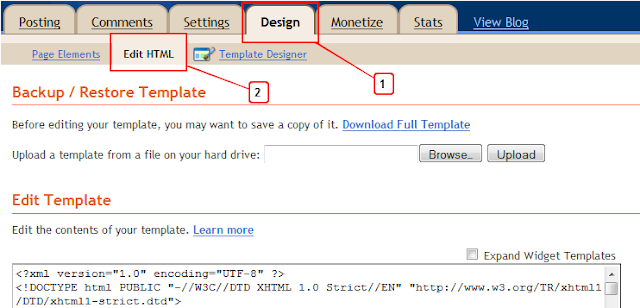
1. Login to your blogger account and click on Design > Edit HTML2. Now Press CTRL = F and search for </head>
3. Paste the following code just above this :
<meta HTTP-EQUIV='REFRESH' content='0; url=http://my-new-blog-address'/>
<meta content='NOINDEX, NOFOLLOW' name='ROBOTS'/>
Please change my-new-blog-address to your own new address :

Note :
content='0 as shown in the code determines how long (in seconds) your visitors will stay on the old blog before being redirected. I set it to Zero but you might change it depending on your choice.Also <meta content='NOINDEX, NOFOLLOW' name='ROBOTS'/> tells search engines to stop indexing posts on your old blog.
This prevents your new blog from being penalize by Google for duplicate content as pages indexed on the old blog will be removed in due time.
How To Remove Spaces Between Posts in Blogger
Removing the spaces between the blogger posts which may cover most of the area on your blog so we will simply remove that space by modifying the margin parameters and hence you can increase or decrease the space between the posts.
So from the above images you can get an idea on what we are going to do and the user who requested this post, I Hope if he is reading would be satisfied on what he demanded.Follow the below procedure to remove space between posts :
1. Go to Blogger.com2. Sign in and click on Design Tab
3. Now go to Edit HTML and first just backup your template.
4. Now click on Expand Widgets Template and press Ctrl + F to open the search feature.
5. Now search for .post-outer and you will something like below :

So now if you want more space just make it 50px, if you want less space then modify it too 5px to 10px.
That’s it now you know how to increase and decrease space between the blogger post..
Floating Back To Top Button For Blogger

Add Back To Top Button To Blogger
Step 1. In your dashboard click Design'> Add A Gadget > Choose Html/Javascript from the pop up menu.
Step 2. Copy The Code Below And Paste It Into The Html/Javascript gadget.
<a href='http://thenetfabz.blogspot.com'><img alt='Best Blogger Tips' src='https://blogger.googleusercontent.com/img/b/R29vZ2xl/AVvXsEiIAQcq0TjeGeIYX506m9GQfB8no4Lm6QigHDQnG61ssbWVaTJSy1ONkx0XD7eAYPFDYy_n7CF9sB6i0vM_kkNlmYiVecLmj4QYbLnIJDGeU1GXYf2tYQ3HjY8V8YCuW6BsDZBOl4sMO8cl/s1600/best+blogger+tips.png'/></a><script type="text/JavaScript">
var topMargin = 300
var slideTime = 1200
var ns6 = (!document.all && document.getElementById);
var ie4 = (document.all);
var ns4 = (document.layers);
window.setInterval("main()", 10)
function floatObject() {
if (ns4 || ns6) {
findHt = window.innerHeight;
} else if(ie4) {
findHt = document.body.clientHeight;
}
}
function main() {
if (ns4) {
this.currentY = document.floatLayer.top;
this.scrollTop = window.pageYOffset;
mainTrigger();
} else if(ns6) {
this.currentY = parseInt(document.getElementById('floatLayer').style.top);
this.scrollTop = scrollY;
mainTrigger();
} else if(ie4) {
this.currentY = floatLayer.style.pixelTop;
this.scrollTop = document.body.scrollTop;
mainTrigger();
}
}
function mainTrigger() {
var newTargetY = this.scrollTop + this.topMargin
if ( this.currentY != newTargetY ) {
if ( newTargetY != this.targetY ) {
this.targetY = newTargetY
floatStart();
}
animator();
}
}
function floatStart() {
var now = new Date()
this.A = this.targetY - this.currentY
this.B = Math.PI / ( 2 * this.slideTime )
this.C = now.getTime()
if (Math.abs(this.A) > this.findHt) {
this.D = this.A > 0 ? this.targetY - this.findHt : this.targetY + this.findHt
this.A = this.A > 0 ? this.findHt : -this.findHt
} else {
this.D = this.currentY
}
}
function animator() {
var now = new Date()
var newY = this.A * Math.sin( this.B * ( now.getTime() - this.C ) ) + this.D
newY = Math.round(newY)
if (( this.A > 0 && newY > this.currentY ) || ( this.A < 0 && newY < this.currentY )) {
if ( ie4 )floatLayer.style.pixelTop = newY
if ( ns4 )document.floatLayer.top = newY
if ( ns6 )document.getElementById('floatLayer').style.top = newY + "px"
}
}
//-->
</script>
<div id="floatLayer" style="position: absolute; height:20px; width:15; left:650px; top:400px; z-index: 100"><a href="#"><img vspace="0" border="0" hspace="0" alt="Back to Top" src="https://blogger.googleusercontent.com/img/b/R29vZ2xl/AVvXsEh8ac9b_heUrS5Aq5ZMyeTGec6hrtlXbOeLNmqgYohmPPP17g2dcIx7sTCkVWww56KhmJ0X9Er1jVTMoyRePhh__NOXuaCIJD1Tu6f3oaHXjRlBAzRZShd3OPEf8JBW0Hn_1blf3erinC8x/s1600/TOP+BUTTON.gif" title="Back To Top Of Page" /></a></div><a href="http://spiceupyourblog.com" target="_blank"><small>Blogger Top Gadget</small></a>
Important
If the button stops in the middle of your page and not at the bottom increase the number in red at the start of the code, for example in the demo i had to set that number to 500.
left:650px; = How far from the left the button appears you can increase and decrease it to suit your blog.
top:400px; = How far from the top it appears.
You can change the image used for the button by changing the image URL in blue to any image you wish to use.
Step 3. Save your template - You can drag and drop the gadget to the bottom of your design page as position wont effect the gadget.
Awesome New Google Search Style Search Bar For Blogger

Once on your blog it will look the very same, using jQuery for the X delete button and your blogs default search to generate results.This was covered on the Awesome Queness.Com design blog and with just a few changes i have it ready to go For Blogger.
Add The New Google Style Search Bar To Blogger
Remember Always Back Up Your Template Before You Make Change
Step 1. In Your Blogger Dashboard Click Design > Edit Html
Step 2. Find the following piece of code in your blogs Html : (Click Ctrl and F for a search bar to help find the code )
]]></b:skin>
Step 3. Copy and Paste the following code Directly Above / Before ]]></b:skin>
-Scroll Box Make Sure To Get All The Code.
/*Start Css For Google Style Search Box*/
/* div container containing the form */
#searchContainer {
margin:20px;
}
/* Style the search input field. */
#field {
float:left;
line-height:27px;
text-indent:10px;
font-family:arial, sans-serif;
font-size:1em;
color:#333;
background: #fff;
border:solid 1px #d9d9d9;
border-top:solid 1px #c0c0c0;
border-right:none;
}
/* Style the "X" text button next to the search input field */
#delete {
float:left;
width:16px;
height:29px;
line-height:27px;
margin-right:15px;
padding:0 10px 0 10px;
font-family: "Lucida Sans", "Lucida Sans Unicode",sans-serif;
font-size:22px;
background: #fff;
border:solid 1px #d9d9d9;
border-top:solid 1px #c0c0c0;
border-left:none;
}
/* Set default state of "X" and hide it */
#delete #x {
color:#A1B9ED;
cursor:pointer;
display:none;
}
/* Set the hover state of "X" */
#delete #x:hover {
color:#36c;
}
/* Syle the search button. Settings of line-height, font-size, text-indent used to hide submit value in IE */
#submit {
cursor:pointer;
width:70px;
height: 31px;
line-height:0;
font-size:0;
text-indent:-999px;
color: transparent;
background: url(https://blogger.googleusercontent.com/img/b/R29vZ2xl/AVvXsEhVqio1r4Jo0ag-iERQwL4hLpA9rEJVpm9e7NvyVWh_sU22foze0p3XJ1qH6dgtbKOrm-BHcIBOBNIlWSYxAHKWybF91lc3DbKvTuiSljQjBiD1LvtFL92oGyj4T_vv09DRNU0_L8PZ6OQm/s1600/ico-search.png) no-repeat #4d90fe center;
border: 1px solid #3079ED;
-moz-border-radius: 2px;
-webkit-border-radius: 2px;
}
/* Style the search button hover state */
#submit:hover {
background: url(https://blogger.googleusercontent.com/img/b/R29vZ2xl/AVvXsEhVqio1r4Jo0ag-iERQwL4hLpA9rEJVpm9e7NvyVWh_sU22foze0p3XJ1qH6dgtbKOrm-BHcIBOBNIlWSYxAHKWybF91lc3DbKvTuiSljQjBiD1LvtFL92oGyj4T_vv09DRNU0_L8PZ6OQm/s1600/ico-search.png) no-repeat center #357AE8;
border: 1px solid #2F5BB7;
}
/* Clear floats */
.fclear {clear:both}
/*End Google Style Search Bar - Info @ http://www.spiceupyourblog.com*/
/* div container containing the form */
#searchContainer {
margin:20px;
}
/* Style the search input field. */
#field {
float:left;
width:200px;
height:27px;line-height:27px;
text-indent:10px;
font-family:arial, sans-serif;
font-size:1em;
color:#333;
background: #fff;
border:solid 1px #d9d9d9;
border-top:solid 1px #c0c0c0;
border-right:none;
}
/* Style the "X" text button next to the search input field */
#delete {
float:left;
width:16px;
height:29px;
line-height:27px;
margin-right:15px;
padding:0 10px 0 10px;
font-family: "Lucida Sans", "Lucida Sans Unicode",sans-serif;
font-size:22px;
background: #fff;
border:solid 1px #d9d9d9;
border-top:solid 1px #c0c0c0;
border-left:none;
}
/* Set default state of "X" and hide it */
#delete #x {
color:#A1B9ED;
cursor:pointer;
display:none;
}
/* Set the hover state of "X" */
#delete #x:hover {
color:#36c;
}
/* Syle the search button. Settings of line-height, font-size, text-indent used to hide submit value in IE */
#submit {
cursor:pointer;
width:70px;
height: 31px;
line-height:0;
font-size:0;
text-indent:-999px;
color: transparent;
background: url(https://blogger.googleusercontent.com/img/b/R29vZ2xl/AVvXsEhVqio1r4Jo0ag-iERQwL4hLpA9rEJVpm9e7NvyVWh_sU22foze0p3XJ1qH6dgtbKOrm-BHcIBOBNIlWSYxAHKWybF91lc3DbKvTuiSljQjBiD1LvtFL92oGyj4T_vv09DRNU0_L8PZ6OQm/s1600/ico-search.png) no-repeat #4d90fe center;
border: 1px solid #3079ED;
-moz-border-radius: 2px;
-webkit-border-radius: 2px;
}
/* Style the search button hover state */
#submit:hover {
background: url(https://blogger.googleusercontent.com/img/b/R29vZ2xl/AVvXsEhVqio1r4Jo0ag-iERQwL4hLpA9rEJVpm9e7NvyVWh_sU22foze0p3XJ1qH6dgtbKOrm-BHcIBOBNIlWSYxAHKWybF91lc3DbKvTuiSljQjBiD1LvtFL92oGyj4T_vv09DRNU0_L8PZ6OQm/s1600/ico-search.png) no-repeat center #357AE8;
border: 1px solid #2F5BB7;
}
/* Clear floats */
.fclear {clear:both}
/*End Google Style Search Bar - Info @ http://www.spiceupyourblog.com*/
Note - To change the width of the search bar simply change the line highlighted in Red from 200px up or down.
Step 4. Find the following piece of code in your blogs Html : (Click Ctrl and F for a search bar to help find the code )
</head>
Step 5. Now Copy And Paste This Code Directly Above / Before </head>
Note - If you have previously added jQuery script to your template you can remove the code highlighted in green.
<script src='http://code.jquery.com/jquery-1.6.1.min.js' type='text/javascript'/><script type='text/javascript'>
$().ready(function() {
// if text input field value is not empty show the "X" button
$("#field").keyup(function() {
$("#x").fadeIn();
if ($.trim($("#field").val()) == "") {
$("#x").fadeOut();
}
});
// on click of "X", delete input field value and hide "X"
$("#x").click(function() {
$("#field").val("");
$(this).hide();
});
});
</script>
Step 6. Save your template, we have the Css added to style the search bar and the jQuery for the X button now we add the html.
Step 7. Head back to your blogs design page and click Add A Gadget > Choose Html/Javascript.


Step 8. Copy and Paste the following code into the Html/Javascript gadget :
<div id="searchContainer">
<form name="SUYB" action="/search" method="get">
<input type="text" id="field" id="s" name="q"/>
<div id="delete"><span id="x">x</span></div>
<input type="submit" name="submit" id="submit" value="Search" />
</form>
</div>
Step 9. Save the html/javascript gadget and you can drag and drop it into place.
A Simple jQuery Powered Drop Down Menu For Blogger
Add The Simple Drop Down Menu To Blogger
Remember Always Back Up Your Template Before You Make Changes - How To Back Up A Blogger Template
Step 1. In Your Blogger Dashboard Click Design > Edit Html
Step 2. Find the following piece of code in your blogs Html : (Click Ctrl and F for a search bar to help find the code )
</head>
Step 3. Copy and Paste the following code Directly Above / Before </head>
<!--start drop menu-->
<style type='text/css'>
/* menu styles */
#jsddm
{ margin: 0;
padding: 0;}
#jsddm li
{ float: left;
list-style: none;
font: 12px Tahoma, Arial}
#jsddm li a
{ display: block;background: #0033CC; /*MENU MAIN BACKGROUND COLOR*/-moz-border-radius: 6px;-webkit-border-radius: 6px;padding: 5px 12px;
text-decoration: none;
border-right: 1px solid white;
width: 70px;color: #EAFFED; /*MENU LINK COLOR*/white-space: nowrap}
#jsddm li a:hover
{ background: #24313C /*MENU HOVER BACKGROUND COLOR*/; -moz-border-radius: 6px;-webkit-border-radius: 6px;}
#jsddm li ul
{ margin: 0;
padding: 0;
position: absolute;
z-index:100;
visibility: hidden;
border-top: 1px solid white}
#jsddm li ul li
{ float: none;
display: inline}
#jsddm li ul li a
{ width: auto;background: #BFCFFE; /*MENU DROP DOWN BACKGROUND COLOR*/color: #24313C /*MENU DROP DOWN LINK COLOR*/}
#jsddm li ul li a:hover
{ background: #809FFE /*MENU DROP DOWN HOVER BACKGROUND COLOR*/}
</style>
<script src='http://ajax.googleapis.com/ajax/libs/jquery/1.2.6/jquery.min.js' type='text/javascript'/>
<script type='text/javascript'>
var timeout = 500;
var closetimer = 0;
var ddmenuitem = 0;
function jsddm_open()
{ jsddm_canceltimer();
jsddm_close();
ddmenuitem = $(this).find('ul').eq(0).css('visibility', 'visible');}
function jsddm_close()
{ if(ddmenuitem) ddmenuitem.css('visibility', 'hidden');}
function jsddm_timer()
{ closetimer = window.setTimeout(jsddm_close, timeout);}
function jsddm_canceltimer()
{ if(closetimer)
{ window.clearTimeout(closetimer);
closetimer = null;}}
$(document).ready(function()
{ $('#jsddm > li').bind('mouseover', jsddm_open);
$('#jsddm > li').bind('mouseout', jsddm_timer);});
document.onclick = jsddm_close;
</script>
<!--end menu code-->
Note - In yellow i have highlighted the colors used, you can change these by using a different color code.You can find the code for the colors you want with html color code generator.
Note 2. - If the rounded corners are not to your liking remove the two sections highlighted in red and there gone !
Step 4. Save Your Template.
That's the Css and jQuery added next is to add the html for your menu.
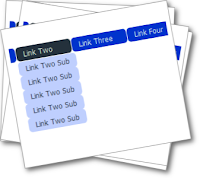
Now go to your blogs Design Page, we will be adding the menu across your blog below the header.This area is called Cross Column and can be see in the image below.If your blog does not have this section available you can see how to enable it here - Add Full Width Cross Column Gadgets To Blogger.

Add The Menu Html
In your blogs Design Page click Add A Gadget > Choose Html/Javascript > Copy and paste the following code into the Html/Javascript gadget :
<ul id="jsddm">
<li><a href="/">Home</a>
<li><a href="#">Link One</a>
<ul>
<li><a href="#">Link One Sub</a></li>
<li><a href="#">Link One Sub</a></li>
<li><a href="#">Link One Sub</a></li>
</ul>
</li>
<li><a href="#">Link Two</a>
<ul>
<li><a href="#">Link Two Sub</a></li>
<li><a href="#">Link Two Sub</a></li>
<li><a href="#">Link Two Sub</a></li>
<li><a href="#">Link Two Sub</a></li>
<li><a href="#">Link Two Sub</a></li>
</ul>
</li>
<li><a href="#">Link Three</a></li>
<li><a href="#">Link Four</a></li>
<li><a href="#">Link Five</a></li>
</li></ul>
This is the code that makes up the menu in the demo.Replace the hash tags (#) with your links and the text with ehhh your text :D.If you want to add more links you can do so in the same way, take a few minutes to look at the layout of the code and you will see how it works.
Template Designer Tabs Fix
If you use a template from the Blogger Template Designer there is a section of Css that will effect this or any menu you place in the cross column section.This is called tabs and you will need to remove or over ride the tabs css.
Make sure to Check out more of our Blogger Tips.
Adding Infolinks Related Tags below Post Title
How you can put the info links related to ask above and below the post title in blogger blogs. This can be useful to increase your Revenue and give you much much higher earnings.
Follow the below steps :
1. Go to Infolinks website and Sign in with your account.2. Now click on the tab saying “NEW” ( this is where related would be applied ) related tags that look something like below :

3. So in this section you have two options to choose from :
- Automatic Option : by just clicking the check box it automatically adds your related tags to the main optimized area.
- Manual Placement : this is what we are going to use and this will help us placing our tags above or below the post title.
5.Now go to blogger.com and simply Sign In, after signing in go to Design and the Edit HTML.
6. Now first of all backup your template for future problems and now click expand widgets template check box.
7. Press Ctrl + F to open the search feature and search for below code :
<data:post.body/>
8. Now it will be highlighted like below :

9. Now if you want to show the Infolinks related tags just below the Post Title simply ass the manual placement code above this line and if you wanna show the code in the post footer like my posts are showing just ass the manual placement code below this line like below :
<input name='IL_RELATED_TAGS' type='hidden' value='1'/>

10. That’s it now you will have related tags showing in the posts section so enjoy.
Enjoy higher revenue with Infolinks.
Subscribe to:
Comments (Atom)


© 2010-2012 HACKINGUNIVERSITY. The content is copyrighted to Rishabh Jain and may not be reproduced on other websites. Google+