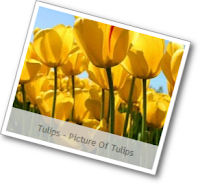
 In this blog tip we will look at a quiet simple way to add captions or descriptions to the images used on your blog.On Blogger there is an option when you click on an image uploaded to the post editor to add a caption.This adds the caption below the picture using a table.However with just a few lines of Css we can have the caption across the bottom on top of the image with an neat opacity background.You can also change the colors of the caption to suit your blogs design, You can see some examples in the demo below.
Adding Css Captions To Images On Blogger
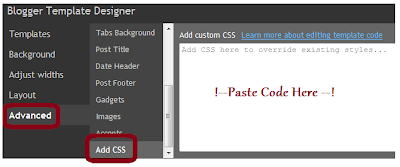
Step 1. In your Blogger dashboard click Design > Template Designer > Advanced > Add Css :


Step 2. Copy and Paste the following code into the section provided :
.imgcaption {
padding-bottom:10px;
padding-top:30px;
position:relative;
}
.imgcaption cap {
position:absolute;
left:0%;
right:0%;
padding:10px;background:#dddddd;color:ffffff;opacity:0.8 !important;
bottom:6%;
}
Note - You can change the background and font color the caption by changing the color code highlighted in green - Color Code Generator.
Step 3. Click 'Apply To Blog' in the top right corner.
That's the css added now you just need to add tags to the images you want to have a caption.
In the image below you can see in yellow the div tag added and closed and in red the caption added in 'cap' tags.
<div class="imgcaption"><a href="https://blogger.googleusercontent.com/img/b/R29vZ2xl/AVvXsEimyBzdBq8vRreTjRpMuNYtaEZLTGkoL0J5xjX1bJZOlrUxk3fDlEJmkrVhBcYA1Sp1hCN7637u5hS9lSreq8BMvMuV6-aaZMO7KP_vW72fhmLY7PD-vlG0O5JrRKrDOBVV649avB-qXWKi/s1600/Desert.jpg"><img src="https://blogger.googleusercontent.com/img/b/R29vZ2xl/AVvXsEimyBzdBq8vRreTjRpMuNYtaEZLTGkoL0J5xjX1bJZOlrUxk3fDlEJmkrVhBcYA1Sp1hCN7637u5hS9lSreq8BMvMuV6-aaZMO7KP_vW72fhmLY7PD-vlG0O5JrRKrDOBVV649avB-qXWKi/s320/Desert.jpg"/></a><cap>Desert - Picture Of The Desert</cap></div>
Images uploaded to Blogger already have class="separator" so we just change change separator to imgcaption.Then we add the actual caption as shown in red.
From This :
<div class="separator" style="clear: both; text-align: center;">
<a href="https://blogger.googleusercontent.com/img/b/R29vZ2xl/AVvXsEiM8WaO_P2POsWvZb6sVzT-xJ6vDf3lt4Mo2WSFx97JIfNunymwsOJxZjybPfPbcMP2i0OqhVFfzhPmVE0oZmG8SarAOPqehyphenhyphenz917PHsCMfrMtvNos48W0CP9u18J3VBlSi9k1LTOyTHaOa/s1600/Lighthouse.jpg" imageanchor="1" style="margin-left: 1em; margin-right: 1em;"><img border="0" height="240" src="https://blogger.googleusercontent.com/img/b/R29vZ2xl/AVvXsEiM8WaO_P2POsWvZb6sVzT-xJ6vDf3lt4Mo2WSFx97JIfNunymwsOJxZjybPfPbcMP2i0OqhVFfzhPmVE0oZmG8SarAOPqehyphenhyphenz917PHsCMfrMtvNos48W0CP9u18J3VBlSi9k1LTOyTHaOa/s320/Lighthouse.jpg" width="320" /></a>
To This
<div class="imgcaption" style="clear: both; text-align: center;">
<a href="https://blogger.googleusercontent.com/img/b/R29vZ2xl/AVvXsEiM8WaO_P2POsWvZb6sVzT-xJ6vDf3lt4Mo2WSFx97JIfNunymwsOJxZjybPfPbcMP2i0OqhVFfzhPmVE0oZmG8SarAOPqehyphenhyphenz917PHsCMfrMtvNos48W0CP9u18J3VBlSi9k1LTOyTHaOa/s1600/Lighthouse.jpg" imageanchor="1" style="margin-left: 1em; margin-right: 1em;"><img border="0" height="240" src="https://blogger.googleusercontent.com/img/b/R29vZ2xl/AVvXsEiM8WaO_P2POsWvZb6sVzT-xJ6vDf3lt4Mo2WSFx97JIfNunymwsOJxZjybPfPbcMP2i0OqhVFfzhPmVE0oZmG8SarAOPqehyphenhyphenz917PHsCMfrMtvNos48W0CP9u18J3VBlSi9k1LTOyTHaOa/s320/Lighthouse.jpg" width="320" /></a><cap>Lighthouse - Picture Of A Lighthouse</cap></div>
Thanks it a simple blog tip for captions on images.

No comments:
Post a Comment